How To Make A Ginger Tincture
POSTED SEPTEMBER 13, 2021 BY SHERRA V. IN ALL ARTICLES, BACKYARD PLANTS, HOUSEHOLD REMEDIES, HOW TO, RECIPES13
Ginger is one of those ingredients whose uses seem almost limitless. Ginger is used as food, as a flavoring for food and beverages, as culinary medicine, in aromatherapy, in herbal medicine, and as tea, among many others. This delicious, helpful ginger tincture incorporates all the above. Incredibly, the use of this simple ginger tincture aids a plethora of health issues.
The benefits of ginger are vast. The recipe below shows details of extracting those many benefits. It also shows how to use the tincture for maximum advantage.
A Short History Of Ginger
Ginger (Zingiber officinalis) has been used by humans for a long, long time. We can tell that it was used in medieval times as the name, officinalis, denotes it was kept as medicine during this period. The first records of ginger being used date back much farther. In fact, it is thought that ginger has been used for over 5000 years. Its use has spread globally, possibly first originating in Maritime Southeast Asia. It reached Europe via Asia during the Spice Trade and was used by ancient Greeks and Romans, possibly as far back as 1500 BC.
In current times, ginger influences the cuisines of many cultures. Incredibly, global ginger production reaches over 3 million tons annually. With India producing 1 million tons themselves, and many other tropical countries having large annual production including China and Nigeria.
To extol the many virtues of this delicious aromatic plant is only a challenge in not missing any virtue of importance. For this reason, we have made two categories of how to use and benefit from ginger, although they are somewhat intertwined.
Edible Uses Of Ginger:
Ginger root or rhizome is used in cooking and baking. The hot and spicy flavor lends itself well to both sweet and savory dishes.
- Flavoring of cakes, cookies, and candies.
- Flavoring dishes such as curries and stir-fries.
- Flavoring condiments such as chutneys and pickles.
- Flavoring beverages including tea, ginger beer, and ginger ale.
Medicinal Uses Of Ginger:
Impressively, ginger is an ingredient in over half of Ayurveda and Chinese medicine preparations.
- It aids digestive issues including indigestion, colic, stomach spasms, and helps aid stomach emptying.
- It treats nausea including motion sickness and importantly, morning sickness.
- Ginger is a powerful antioxidant; thus, it helps to reduce oxidative stress.
- Ginger may help improve cholesterol levels.
- Ginger can improve pain issues including sprains, spasms, osteoarthritis, and menstrual cramps.
- The gingerol in ginger may be a substance that can help prevent types of cancer.
- Taking ginger powder may lower blood sugar levels and provide antidiabetic support which may, in turn, reduce risk factors of heart disease.
- Because ginger extracts have been shown to inhibit certain bacteria, it is helpful in reducing the risk of infection.
- Due to gingers’ anti-inflammatory and antioxidative properties, it shows promise to enhance brain function while reducing degenerative cognitive decline.
Where To Find Ginger
Ginger grows in tropical climates, in zones 9 to 12. It takes about 8 to 10 months from planting to harvest. In general, ginger is grown from ginger seed, which is much like potato seed. That is to say, ginger is grown from pieces of ginger root. In a large production, ginger is grown with the monsoons, so requires a lot of water.
To grow ginger at home, it may be possible if you can replicate growing conditions such as tropical climate, rich soil, protection from wind and frost, humidity, as well as necessary irrigation requirements.
The root of ginger is most often what is available. If you are able to grow your own ginger, it is interesting that in addition to the roots, the flowers, pseudostems, new shoots, and leaves also have edible uses.
Otherwise, ginger is generally available fresh at most grocery stores. It is also found dried and ground. There are many reasons to use dried ginger. This is because, surprisingly, certain beneficial properties of ginger are more available from dried ginger products rather than those found in fresh ginger.
As I tend to use ginger for cooking, I more often have fresh ginger in the kitchen.
Tincture Ingredients
- Dry ground ginger or fresh chopped ginger.
- High-quality alcohol such as vodka or brandy.
- Dry ground ginger to alcohol ratio: 1-part dried ginger to 3 parts alcohol.
- Fresh chopped ginger to alcohol ratio: 1-part fresh ginger to 1 – 2 parts alcohol.
We are using an extraction method using high-quality alcohol. This is because alcohol has an incredible ability to work as a solvent that extracts beneficial components from plants. It is remarkably able to do this at room temperature over a short period of time. It also makes the plant’s beneficial components shelf-stable.
There are other ingredients that also work as extractors. In fact, water extracts beneficial plant components when we simply make tea. My understanding is that if it is a tincture, it has an alcohol-based extraction method. For those who prefer a non-alcohol option, a choice is to use vegetable-based glycerin, for an alcohol-free extraction.
The alcohol I am using is from a local distillery. You might choose to use unflavored clear liquor such as vodka. Tinctures are also often made from brandy.
Method
This method follows the philosophy of simple-is-best. We will be using the simple or folk method. This is relatively easy and requires only basic equipment. Essentially, we put our ginger root in a glass container, cover it with alcohol, and allow it to steep for several weeks.
Step 1: Gather ingredients and equipment. Clean and sterilize a jar or container. Wash ginger.
Step 2: Remove ginger root’s peel. The easiest method to do this is to gently scrape the peel off with a spoon.
Step 3: Rough chop the clean, peeled ginger root. You will notice how juicy it is!
Step 4: Place ginger in a clean, sterilized glass jar and cover with your choice of alcohol.
Step 5: Seal the jar and put it in a cool, dark place for 4 to 6 weeks. Check on the tincture every so often to give it a shake or a stir.
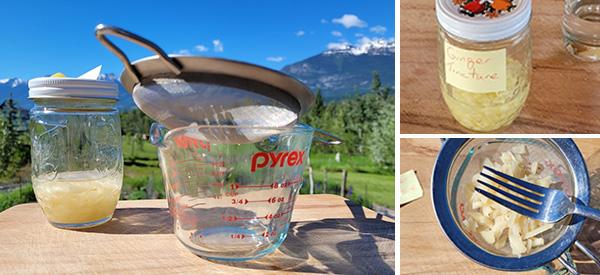
Step 6: At the desired time, get ready to strain or sieve the ginger tincture. As the chopped ginger root is rather large, a fine mesh strainer is often fine enough to sieve off the liquid alcohol.
Step 7: Press the ginger root to expel as much of the tincture as possible. The remaining alcohol-soaked ginger chunks can be dried or refrigerated to use as garnishes for fun summer adult beverages. I’m drying these and plan to soak them in maple syrup to serve with homemade hard ginger-lemonade.
Step 8: The 2 ounces of ginger tincture that is made here can be kept in the fridge to use for flavoring beverages. It is powerful and strongly flavored with hot, spicy ginger. It might also be placed in a tincture bottle with a dropper for ease of use.
How To Use Ginger Tincture
Ginger Tincture is excellent to use in daily tonics, and as a digestive aid before or after a meal. The ginger tincture can be added to a cup of tea or other warm beverage of your choice. It is also delicious added to cold beverages and flavored waters such as cucumber water. Yet, another great way to use this tincture is to include it in homemade salad dressings, marinades, and stir fry sauces.
Warm Soothing Beverage With Ginger Tincture
- 1 teaspoon each ginger tincture, pure lemon juice, sweetener of your choice. Honey is always lovely. Try dandelion syrup to boost the health benefits.
- Add to 2 cups pure, high-quality water that is just simmered but not boiling. Enjoy.
Refreshing Hard Ginger-Lemonade
- 1 tablespoon each pure lemon juice, and maple syrup.
- 1 teaspoon ginger tincture.
- 1-ounce vodka or distilled liquor.
- 1 cup tonic or soda water.
- Garnish with dried alcohol-soaked ginger, if desired.
Ginger Tincture Dosage
Use 10 drops or 1 teaspoon of ginger tincture up to 3 times a day, as needed.
Cautions
Ginger constituents and extracts are suggested to be safe.
An allergic reaction is always possible with new substances. Try a skin test by putting a small amount on the inside of your wrist a day or two before commencing using a ginger tincture. Check for any rash, hives, or itchiness that may indicate an adverse allergic reaction.
Of course, follow the advice of your medical professional regarding starting any new supplement. Do check with your health care providers about any possible medication contraindications. Care should also be taken if pregnant or nursing due to the alcohol content and possible side effects from ginger.
Final Thoughts
The ginger tincture is a delicious way to incorporate this incredibly healthful plant into your daily routine. It has many helpful benefits to aid digestion, nausea, and pain, among many other conditions. We hope this strong ginger concentrate is one more helpful way to include ginger’s many benefits into your day.
You may also like:
Anti-Inflammatory Ginger Gummies
How to Make an Immunity Boosting Shot with Celery, Spinach, Ginger, Lemon, and Manuka Honey
Homemade Ginger And Chickweed Poultice For Circulation And Sore Muscles
If you liked our article don’t forget to pin it!
Please Spread The Word – Share This Post
13 Comments
KAT DUCHOWICZ POSTED SEPTEMBER 13, 2021 3:12 PMCan this be kept in the cabinet instead of the fridge,?Reply
RITA POSTED SEPTEMBER 14, 2021 2:10 PMUsually, yes. be sure to store in a dark, cool cabinet. alcohol, over time and with uv exposure can denature and change the chemical structure of the tincture. usually for 8months(ish) to a year(ish) depending on how well it is strained and stored. I only make enough to keep on hand or about 4-6 months. I dry my ginger (fresh is best) so i tend to use more of the dried material when using it for tinctures. Plus, if you make a little at a time you will find what works best for you and won’t waste a lot if you mess up a large batch.Reply
WINFRED POSTED SEPTEMBER 14, 2021 11:14 PMWill the tincture be alcoholic when ready? Can I add mint leaves to make mint ginger tincture? Thank youReply
STEVEN POSTED SEPTEMBER 13, 2021 3:36 PMNice, thank you! Making the Ginger Tincture with Apple Cider, is that also a very good option?Reply
THE LOST HERBS POSTED SEPTEMBER 21, 2021 4:56 PMHi Steven,Thank you for your comment.If you do not wish to use alcohol to make your tincture, you can replace it with either apple cider vinegar or vegetable glycerin. In this case, it’s better to use dried ginger, instead of fresh ginger.You also can find more details about non-alcoholic tinctures in the article below:
https://thelostherbs.com/how-to-make-a-tincture-using-apple-cider-vinegar-instead-of-alcohol/Many blessings and good health!Reply
CASEY POSTED SEPTEMBER 13, 2021 4:22 PMI eat a candy you can find at many grocery stores and online. It is called Gin Gins. They are a chewy ginger candy, kind of like a piece of taffy, but with kick. It’s available in different varieties, including spiced apple (which is my favorite!) I’m just happy to finally see ginger coming to the Lost Herbs emails.Reply
SANDRA POSTED SEPTEMBER 13, 2021 5:08 PMLove fresh ginger tea, used it for my stomach and feet!Reply
FLORENCE J-C POSTED SEPTEMBER 13, 2021 6:56 PMThank you for these beautiful ideas. They are most helpful, especially at this time. Many blessings to all.Reply
THE LOST HERBS POSTED SEPTEMBER 21, 2021 4:59 PMHi Florence,Thank you for your continued support!
We are glad to hear that you find our articles helpful.Many blessings and good health!Reply
FRANCES JORDAN POSTED SEPTEMBER 14, 2021 9:21 AMI live in a mountainous area of Thailand where ginger is grown as a cash crop.. There is a high amount of various chemicals used growing this crop. Those who grow it prefer to use what they grow separately without the chemicals.
Be aware of your source if you use fresh ginger.
If anyone has information on detoxing commercial ginger I would appreciate knowing this.ReplyTAMMY POSTED SEPTEMBER 14, 2021 11:37 AMI live in Ky. We have Wild ginger here. It is also known as colt’s foot. Does it wirk the same way? We have always used it to settle an upset stomach.Reply
THE LOST HERBS POSTED SEPTEMBER 21, 2021 5:08 PMHi Tammy,Wild ginger is also known as colic root since it’s used indeed to treat colic, upset stomach, indigestion, and cramps.However, Wild Ginger and Coltsfoot are two different plants.Many blessings and good health!Reply
ADINA POSTED APRIL 5, 2022 2:21 PMI made this tincture and it’s wonderful, my husband and I take it every day so thank you for that. I am currently working on a new tincture with turmeric root and black peppercorns, I’ll let you know how it turns out. Love this site!Reply
Add Comment
Your email address will not be published. Required fields are marked *
Save my name, email, and website in this browser for the next time I comment.
I accept the Privacy Policy
Notify me of followup comments via e-mail. You can also subscribe without commenting.
FOLLOW US
WE RECOMMEND
RECENT POSTS
- 10 Time-Tested Home Remedies
- Don’t Throw Away Your Peels, Do This Instead!
- DIY Painkilling Extract From a Pineapple
- Dong Quai
- Sitting is Dangerous
- Hot Or Cold Water? How It Can Affect Your Digestion
- Fermented Red Clover For Rebuilding Bone Mass
- Devil’s Claw
- These Herbs Will Relieve Your Anxiety in No-Time
- DIY Vitamin Gummies For The Whole Family
- Drink These to Reduce Bloating
- Marjoram
- The Insulin Plant
- DIY Spring Fever Tincture
- Better Than Sleeping Pills
- Valerian
- What Happens If You Eat Chili Peppers for Breakfast?
- Foods and Herbs For Heavy Metal Detox
- DIY Skin Soothing Chickweed and Vinegar Bath for Rashes
- Nettle
CATEGORIES
The Healing Power of Backyard Plants at Your Fingertips
Follow us
 The plant forms small clusters of flowers from mid-summer to early autumn. The blooms appear at intervals along the length of the stem.Flower: The flowers have five, heart-shaped petals and blooms range in color from white to a very pale pink or mauve. The flowers mature into brown seed heads or pods each of which contains dozens of black seeds.
 Root: This herb has a root system that consists of many roots each of which is about the thickness of a pencil. There are multiple smaller roots branching out a short distance from the main root.How To Grow MarshmallowMarshmallow is a hardy plant that can be grown with ease. They do not mind whether they are planted in full sun or partial shade and can thrive in both exposed and sheltered spots. This plant is also not fussy about soil type and will grow in loamy, clay, chalky, or sandy ground and regardless of pH too. However, this herb does not do well in containers.There are several ways you can plant Marshmallow:Seeds: You can buy seeds or harvest them for existing plants. In either case, you will need to store the seeds in the refrigerator so that they think winter is over and germination is triggered.
  Loose seeds should be placed on a damp paper towel inside a plastic bag (unsealed). Bought, packeted seeds can be refrigerated in the packet. In either case, store them this way for 3 to 4 weeks. Seeds can be seeded or planted in potting soil in containers until the seedlings are established or directly into your garden.Root division: These plants die back and become dormant in autumn. You do not need to dig up the plant. Use a sharp spade to cut down through the center of the root mass. Remove one half from the soil and replant it immediately. Fill in the gap next to the original plant so the roots are secure. When you are ready to plant them, place them 1 foot apart.
 Once planted, always keep the soil your Marshmallow plants are moist, especially in the first year. However, the ground should be well-drained, though, so the soil doesn’t become too wet or waterlogged.
 UsesAs a mouthwash to ease mouth ulcers, inflamed gums, or cuts on the cheeks or tongue;You can gargle with – and then swallow – this mixture to soothe a sore throat;Sipping this infusion eases gastric problems such as indigestion, inflammation, and – with regular use – constipation;It can be used as a topical wash for minor wounds and burns.And yes, this infusion can also be used to make traditional marshmallows… but that’s a separate recipe!DosageThe dose or amount used will vary depending on (a) what the remedy is being used for and (b) the type of preparation involved.
 Warning and CautionsIt appears that there are no known contraindications in terms of harmful interactions with medications and drugs. Some warnings include:Avoid using this plant if you are pregnant or breastfeeding as safety levels are unknown;Diabetic patients should avoid using Marshmallow regardless of whether they are on insulin or oral medication;The effects of topical corticosteroids may be magnified by this herb;As with any plant substance, there is the possibility of an allergic reaction.
 Fruit: When the flower goes to seed, it forms a thin, cylindrical, ridged capsule that sits above a flat, circular platform. When they are ready, the capsule bursts in two, and the tiny, round seeds are ejected as far as up to 6 feet / 1.8 meters from the parent plant.Flower: The blooms are cup-shaped and light yellow to bright orange are the most common colors. However, there may also be red or pink ones. Buds have a ‘cap’ over them which pops off when the bloom is ready to open.
 Each flower is borne on a separate stalk or stem and has four, silky, long, broad petals. the flowering season runs from late spring through to early fall.Root: The nature of the root varies depending on the altitude and type of location the plant is growing in. generally, California Poppies form orange, fleshy taproots.
 How To Grow California PoppyEschscholzia californica is easy to cultivate and grow in both flower beds and containers. Once these plants are happily established in full sun and in sandy or loamy soil, they will self-seed… perhaps more than some gardeners would like! The soil they are planted in, in addition to being well-drained, should be pH neutral or alkaline. To plant seeds:- Moisten the soil you will be planting in;
 – Cover the seeds with soil to a depth of 0.2 inches (½ cm);
 Thereafter minimal care is necessary. If you are not harvesting to use the flowers and leaves in remedies, you can deadhead and then trim the plants back when the flowering season is over. As added advantages, California Poppies are drought tolerant and, as a rule, pest- and disease-free.
 3. Cover the cup to retain heat. Leave the tea to steep or draw for up to 20 minutes (naturally, the longer you leave it the stronger it will be)
 4. Strain the liquid into a clean cup or mug.
 Some people find this tea bitter. If you do, you can use a sweetener of your choices such as honey or stevia. You could also experiment with other flavors such as ginger or something sweeter such as mint. You can enjoy up to three cups of this tea daily.DosageHow much you use is impacted by personal factors such as state of health / current medical conditions and age. Moreover, because of the lack of clinical research with California Poppy, it is not surprising that there is no general data about doses.