Category Archives: Uncategorized

The Plant That Is Sweeter Than Sugar And Helps People With Diabetes

img
The Plant That Is Sweeter Than Sugar And Helps People With Diabetes - Step 1
The Plant That Is Sweeter Than Sugar And Helps People With Diabetes - Step 2
The Plant That Is Sweeter Than Sugar And Helps People With Diabetes - Step 3
The Plant That Is Sweeter Than Sugar And Helps People With Diabetes - Step 4
The Plant That Is Sweeter Than Sugar And Helps People With Diabetes - Step 5
The Plant That Is Sweeter Than Sugar And Helps People With Diabetes - Step 6
The Plant That Is Sweeter Than Sugar And Helps People With Diabetes - Licorice Tea Step 4.1
The Plant That Is Sweeter Than Sugar And Helps People With Diabetes - Licorice Tea Step 4.2
The Plant That Is Sweeter Than Sugar And Helps People With Diabetes - Licorice Tea Step 5
The Plant That Is Sweeter Than Sugar And Helps People With Diabetes

The Plant That Is Sweeter Than Sugar And Helps People With Diabetes

POSTED AUGUST 16, 2021 BY CRISSY JOSHUA IN ALL ARTICLESBACKYARD PLANTSHOUSEHOLD REMEDIESRECIPES12

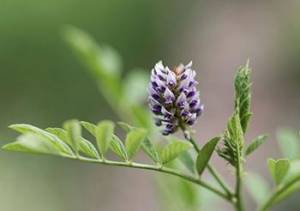
Licorice root is an ancient medicinal remedy that can be traced back to multiple societies including ancient Egyptians, Chinese, Greek, and Middle Eastern. Historically, it was used to treat digestive and stomach complaints and upper respiratory problems. In more recent years, scientists have begun researching whether it can help people with diabetes too.

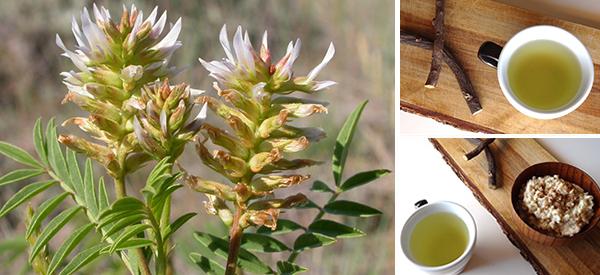
Licorice root can be used for flavoring and as a sweetener. That’s because the sugar in the root is a substance 50 times sweeter than sugar and it also has its own distinctive flavor. Let’s look at how licorice root can help people with diabetes and other health benefits it provides first. Then I will show you two ways you can use licorice root and their recipes: licorice root-infused oatmeal and as a tea.

Medicinal Benefits Of Licorice Root

The Plant That Is Sweeter Than Sugar And Helps People With Diabetes - Licorice Plant

Like I mentioned, licorice root has become increasingly popular in studies related to diabetes. One of the most notable was conducted by a German research group at the Max Planck Institute for Molecular Genetics. They found that licorice root contains natural substances called amorfrutins that reduce blood sugar levels. These amorfrutins also prevent fatty liver, which often arises in people with diabetes. However, the level of amorfrutins found in licorice root might not be high enough to actually replace conventional treatment.

The Plant That Is Sweeter Than Sugar And Helps People With Diabetes - Licorice Root

Many other studies have also been conducted on licorice and diabetes and found that it decreases blood glucose levels and also has the ability to decrease weight gain. When people take insulin, weight gain is often a common side effect. What’s more, being overweight increases the risk of developing type 2 diabetes in the first place so maintaining a healthy weight is great for prevention.

Licorice root can also help treat or relieve a number of other medical conditions including:

Liver disease

  • Gum disease
  • A sore throat
  • Gastrointestinal problems
  • Hot flushes during menopause

It is also highly nutritious and contains:

  • Vitamin A
  • Vitamin C
  • Vitamin E
  • Over 300 flavonoids

Related: An Ingenious Way to Stockpile Prescription Medicines, Including Insulin (Video)

How To Make Licorice Root Infused Oatmeal

Substituting sugar for licorice root in oatmeal makes for a lovely breakfast (or snack!).

The Plant That Is Sweeter Than Sugar And Helps People With Diabetes - Ingredients

The licorice root gives it a distinctive flavor as well as adding sweetness.

Ingredients

  • 1 Licorice root (maximum weight = 0.42 oz/12 grams)
  • ½ Cup of milk (plant-based or animal)
  • ½ Cup of water
  • ½ Cup of oats
The Plant That Is Sweeter Than Sugar And Helps People With Diabetes - Utensils

Utensils

  • Small pan
  • Fine-mesh strainer
  • Container/bowl large enough to catch the milk/water from the strainer
  • Chopping board
  • Wooden spatula or spoon
  • Small knife

Method

  1. Weigh a piece of licorice root and choose one that is approximately 0.42 oz / 12 grams, otherwise cut/break one to size.
  2. Cut your chosen root into two by making an indent with your knife by cutting down with force. You probably won’t be able to cut it all the way through with the knife so snap it in half with your fingers along the incision.
  3. Put ½ cup of milk and ½ cup of water in your pan along with your licorice root. Turn the heat to medium and leave it for 5 minutes.
  4. Turn the heat up and wait until you have a gentle simmer and keep it going for another 5 minutes.
  5. When the 5 minutes is up, take it off the heat and strain your mixture so that you retain the milk and water and you can discard the licorice root.
  6. Add your milk/water back into the pan and also add your oats now. Give it all a stir and put on low-medium heat. Cook for approximately 5 minutes and stir the oats frequently.
The Plant That Is Sweeter Than Sugar And Helps People With Diabetes - Step 6.2

If you like your oatmeal runnier you can take it off the heat whenever it’s at the consistency you want. Likewise, if you want them thicker, you can leave them on longer according to your preference.

If it’s hot where you are, you can always make overnight oats by infusing the milk/water with the licorice root (as per steps 1-5) and letting it cool before pouring it over oats and covering it. Then leave it in the fridge and have it the next day.

How To Make Licorice Root Tea

You don’t have to use licorice root in a food recipe to benefit from its goodness. You can always make a simple licorice root tea, which has been used for millennia.

Ingredients

The Plant That Is Sweeter Than Sugar And Helps People With Diabetes - Licorice Tea Utensils
  • 1 Licorice root (maximum weight = 0.42 oz / 12 grams)
  • 1 Cup of water

Utensils

  • Small strainer
  • 2 Mugs
  • Chopping board
  • Small knife

Method

  1. Boil enough water for a cup of water or more to fit your mug.
  2. Weigh a piece of licorice root and choose one that is approximately 0.42 oz / 12 grams, otherwise cut/break one to size.
  3. Cut your chosen root into two by making an indent with your knife by cutting down with force. You probably won’t be able to cut it all the way through with the knife so snap it in half with your fingers along the incision.
  4. Put your licorice root into your mug and pour the boiled water over it. Let it steep for 5 minutes.
  5. Remove the licorice root by straining the mixture into another mug (if you have a small strainer). Otherwise, you can use a fine-mesh strainer and pour the water and root into it, catching the licorice root tea in another container and transferring this to a mug, ready to drink.
The Plant That Is Sweeter Than Sugar And Helps People With Diabetes - Licorice Tea

You can also follow these instructions and use the licorice root to sweeten your favorite type of hot beverage such as black tea by letting it steep with your regular tea and then straining everything.

How Much Licorice Root Should You Take Every Day

The Plant That Is Sweeter Than Sugar And Helps People With Diabetes -Dosage

The maximum amount of licorice root that you should use every day is 0.42 oz / 12 grams. You can take this one time a day or split your root quota in half and take it morning and evening.

The Plant That Is Sweeter Than Sugar And Helps People With Diabetes

Licorice root has two main potential gains for people with diabetes: by lowering blood sugar levels and as a dietary sweetener. While it’s not recommended to replace the medication for diabetes with licorice root, including it in your diet can have many beneficial side effects on your health and it gives you a new, sweeter sugar alternative.

A Word Of Caution

Licorice root contains glycyrrhizin, which is the component that also makes licorice root sweet. It has many positive attributes such as being an antioxidant, anti-inflammatory, and having antimicrobial properties. However, it is also this same glycyrrhizin that can have negative effects.

Large doses can lead to glycyrrhizin accumulation and this has been linked to the following most noted outcomes:

  • Low potassium levels
  • High blood pressure
  • Abnormal heart rhythms

It can also have an adverse effect on certain medications including:

  • Blood pressure medications
  • Cholesterol medications
  • Diuretics
  • Blood thinners
  • Nonsteroidal anti-inflammatory drugs (NSAIDs)

You may also like:

9 Natural Remedies for High Cholesterol and Blood Pressure

Erratic Blood Sugar? Never Eat This Veggie (Video)

How To Make Your Own Natural Sweetener for Diabetes

Foods and Herbs to Avoid When You Have Diabetes

9 Natural Remedies that People with Diabetes Will Find UsefulPlease Spread The Word – Share This Post

12 Comments

  • BARB POSTED AUGUST 16, 2021 4:30 PMWhere can one buy licorice root, or buy a plant? Never seen it (only seen it in supplements)Reply
    • BONNI TUTTLE POSTED AUGUST 17, 2021 2:39 PMTry AmazonReply
  • MARCHAEL JOHNSON POSTED AUGUST 16, 2021 4:47 PMThanks for that very valuable information. I have HBP and take HCT (a diuretic) daily. Many herbal teas I buy include licorice root. I noticed an unusual feeling when I drink these teas so I’ve ditched them. Now I know why. By the way, I’m enjoying “The Lost Book Of Herbal Remedies.”Reply
    • THE LOST HERBS POSTED AUGUST 17, 2021 6:22 PMHi Marchael,Thank you for sharing this with us.
      We are glad to hear that you enjoy “The Lost Book of Herbal Remedies”.Many blessings and good health!Reply
  • SUSAN POSTED AUGUST 16, 2021 5:18 PMApologies if this is an idiotic question, but how much does licorice root or a tincture thereof taste like licorice candy? Alternative sweeteners are wonderful, and the health benefits look great, but many people don’t care for the flavor of typical black licorice or anise.Reply
    • THE LOST HERBS POSTED AUGUST 24, 2021 6:45 PMHi Susan,Licorice root itself is very mild and a little bitter, so when we’re talking about the taste of licorice candy, what we’re really talking about is the flavor anise and fennel. It’s a polarizing taste for sure.Many Blessings and good health!Reply
  • RICHRENO POSTED AUGUST 17, 2021 7:35 AMLactuca Virosa is NOT a member of the lettuce family (there is no such family — but maybe lettuce genus…). It is a member of the largest plant family: Aster (Asteraceae / Compositae) / Sunflower family. Composite because the flowers are in a “head,” a composite. Nearly all heads have many single flowers. For example, the sunflower is not _one_ flower, it is a head or composite of well over 200 individual flowers: each seed is the result of / represents ONE flower. Additionally the yellow petals around the perimeter of the head are singular flowers, but are infertile: they never make a seed.And the “headline” plant, American licorice, the genus is Glycyrrhiza. It is a native plant common on western grasslands and the Great Plains prairie. Whenever someone sees irregular flowers like in the photo, think bean / pea (Fabaceae) family. Plants in the mint family look like that but anytime you a plant with a square stem, think mint family (Labiatae ̶ depending on which plant key one uses). There is only one other family (in the US) with square stems and another couple families with “sorta” square stems). Next time you go to the grocery store or your garden, look at the stems — and you will know to which family it belongs. And speaking of mint family members, shame on you (and others) for promoting catnip (Nepeta sp): look closely at the flowers. They are extremely annoying non-native plants that makes life miserable for those of us who go dog walking, walking in open areas, etc.; those damn seeds stick to almost anything; so leave your hairy (labs, German short-hairs, etc., are OK) dog home or avoid catnip infested areas. It often takes me 20-30 minutes to pull out the seeds. Pulling each seed off my dogs’ coats is completed more quickly by using a tweezers to pull each seed out. Fortunately, the seeds sometimes stick to each other or attach to them and me in seed “clumps.”That picture of fennel sure looks like dill… I am use to seeing fennel with whitish flowers; but both plants look alike when ya get right down to it. Both are in the carrot or cabbage family: Apiaceae. As can be seen, common names of plants and their families are quite variable, but their scientific family name is nearly always determinate — unless plant taxonomists have a Eureka moment or discover here-to-fore unrecognized similarities or differences which causes argument about the “real” scientific name. Relative to dill and fennel, they are both incredibly valuable plant, And without dill, dill pickles (and carrots) would just not taste the same.My bottom line take-away is it would be helpful to consult a botanist of a plant key (or consult Wikipedia) for published articles. I often find inaccuracies that probably only bother plant nerds like me. One final point, the second Latin binomial (scientific name) is not capitalized, but the genus is: Genus species (and sometimes var. for a species variety — not quite their unique species but just a ‘kissin’ sibling. And if you really want to meet a nerd standard, the Genus species is always italicized — or underlined.Reply
    • THE LOST HERBS POSTED AUGUST 17, 2021 6:24 PMHi Richreno,Thank you so much for your continuous support.
      Your feedback is highly appreciated and will help us to improve our ability to serve you and other users of our website.Many blessings and good health!Reply
    • KATHY KILGORE POSTED AUGUST 28, 2021 4:24 PMWhat a good read. Thanks for the lessons….my cotton breeder/
      botanist husband agrees…Reply
  • JAMES POSTED DECEMBER 21, 2021 6:03 PMI want my digital copy and free pamphlets give me a damn call numberReply
    • THE LOST HERBS POSTED DECEMBER 21, 2021 6:18 PMHi James,Thank you for reaching out to us.
      I’m sorry about this, however, The Lost Herbs does not have a call center available at the moment.Please check your personal email. I sent you an email regarding your order.Many blessings and good health!Reply
  • PAULINE POSTED DECEMBER 21, 2021 8:54 PMCan I steep liquorice root and use the liquid to achieve the desired sweetness? Oh and many thanks; because of this article, I realise that the rough sticks sold for a couple of pennies when I was a kid were liquorice root. They were sold as “Spanish wood” and we used to chew them on the way to school; lovely mild taste and great for cleaning teeth!Reply

Add Comment

Your email address will not be published. Required fields are marked *

Save my name, email, and website in this browser for the next time I comment.

 I accept the Privacy Policy

 Notify me of followup comments via e-mail. You can also subscribe without commenting.

Don’t miss out..  

My newsletter is packed with the most up to date knowledge on holistic health practices and powerful natural remedies from the plants growing all around us.NameSUBSCRIBE

e8063aa921b71607088915-frame.png
FOLLOW US

WE RECOMMEND
RECENT POSTS
CATEGORIES
Banner LSF - Honey Meat


The Healing Power of Backyard Plants at Your Fingertips

Follow us

Tea Tree

img
Tea Tree - Identification
Tea Tree Bath Blend for Sore Muscles = Ingredients
Tea Tree Bath Blend for Sore Muscles - step 1
Tea Tree Bath Blend for Sore Muscles - step 2
Tea Tree Bath Blend for Sore Muscles - step 3
Tea Tree Bath Blend for Sore Muscles - step 4
Tea Tree

Tea Tree

POSTED DECEMBER 17, 2021 BY ANN MARIE IN ALL ARTICLESBACKYARD PLANTSHOUSEHOLD REMEDIESPLANT OF THE WEEK6

Tea tree (Melaleuca alternifolia) is a botanical tree highly valued for its oil used in traditional medicine. It is considered as a “medicine chest in a bottle” with its effective antiseptic property. Before they end up in the bottle for consumption, tea trees are just small trees or shrubs with a fluffy appearance and papery barks. The cream-colored flowers and soft linear leaves are the distinguishing characteristics of the tea tree. Processed Melaleuca oil plays an important role in the treatment of skin problems and respiratory symptoms.

Of the many tea tree species, the most popular among aromatherapists is the Melaleuca alternifolia, but not to be confused with Leptospermum scoparium. The former is an Australian variety of tea trees, while the latter is a New Zealand Manuka. Melaleuca leaves are the source of tea tree oils, while the manuka is valued for the honey sourced from its flowers. But while tea tree is effective against skin diseases and bacterial infection, raw and pure tea tree oil are toxic. It should be cultivated and processed properly and should be kept away from children’s reach.

Short History Of Tea Tree

Long before the invention of penicillin, tea tree was already recognized as a potent antibacterial solution in the form of tea.

The name tea tree came from the notion of brewing the leaves of the trees. The infusion was not only used for drinking but also in treating skin infections.

The medical community began to explore and experiment on the effective properties of the tea tree. Studies yield effective antibacterial and antifungal properties that are not caustic or burning for the skin. They became a staple and effective treatment when the foot-fungus became widespread in 1923.

Today, the tea tree is an ingredient not only for beauty and antimicrobial products. It is also marketed as an active ingredient in mouthwash, toothpaste, deodorants, and shampoo. Some cleaning and disinfectant like toilet products and handwash also contain tea tree properties.

Where The Plant Is Found

Tea Tree - Where to Find

Endemic to Australia, tea trees are abundant in the swampy areas and streams where they can get moist soil and full sun. It borders New South Wales and the coastal district of Queensland. Northern Australia hosts about 6.4 million hectares of its forest to different varieties of the Melaleuca.

Tea trees are also easy to grow in USDA hardiness zones 9 to 11. They may be grown indoors, though more tedious than the outdoors. However, they are preferred to be grown indoors when living in hardiness zones below 9 or 8.

Other countries like China, Zimbabwe, South Africa, and Kenya also cultivate tea trees for commercial essential oil production.

Related: The Complete Map of Edible Plants: Find Out What You Have in Your Area! (Video)

How To Identify Tea Tree

Tea trees appear like low trees or high shrubs with a fluffy look. It is a member of the Myrtaceae family with many species. They may grow either as a high shrub or a low tree ranging from 4 to 7 meters tall, while some species can go as high as 35 meters. Aside from their essential oils, tea trees are also grown as fence or garden edging because of their attractive appearance.

  • Leaf. Tea tree leaves are linear and are either arranged alternately or in whorls. It is smooth, soft, and narrow, with no more than 35mm long and 1mm wide in green or dark grey color. These leaves have glands where their essential oils are abundantly located.
  • Flower. Many-flowered spikes with cream or white color bloom from the tea tree in spring and early summer. This mass of spikes gives it a kind of wispy appearance that lasts for only a short period.
  • Roots. As a member of the Myrtaceae family, the tea tree has a taproot and is branched.
  • Stem. A tea tree can grow like a big shrub or a small tree with flaky bark. Hence, it also earned the name paper-bark for its exfoliate stem.
  • Seeds. Melaleuca seed capsules contain fine and tiny globular seeds. These seeds are contained in the fruit cup indefinitely until the plant dies or gets heated in a bush fire.

Tea tree is also planted for stabilizing embankment. It makes not only an attractive fence but also an excellent windbreak. Tea trees have about 300 varieties that are also an excellent source of other types of oils and honey. Some of the popular species of Melaleuca are: Melaleuca linariifolia  and Melaleuca quinquenervia.

Related: Plant Identification Guide – 400 Wild Plants That You Can Forage For (Video)

How To Grow Tea Tree

Tea trees enjoy moist, but well-drained soil and mostly a full sun. They are drought-tolerant, but not frost tolerant. Hence, it is ideal to grow them in places with a warm climate, or as a potted indoor plant in temperate climates. You can propagate tea trees from cuttings or grow them from seeds. Either way, it is an easy and low-maintenance plant that is fast-growing once it has established itself.

Growing Tea Tree From Seeds

Growing Tea Tree 1

The best seeds for planting a tea tree are those that are already 1 to 2 years old. Its germination is straightforward and does not require any treatment before sowing.

You can simply sprinkle tea tree seeds in a pre-drained mixture of peat moss, vermiculite, perlite, or coarse sand. Cover it lightly with perlite or fine sand, just enough to prevent air exposure yet allow sunlight exposure.

Make sure that your germinating tray receives at least six hours of sun. But you should provide a little light during midday by draping a light cloth over it. The tea tree seeds will germinate for about 14 to 30 days.

Related: 10 Plants That You Should Never Plant Together(Video)

Transplanting

You may transplant the tea tree seedlings once they are about 3-inches high and has a set of leaves. Mix half soil and half sand in a pot and dig a 4-inch hole. Plant a seedling into the hole and place it in a sheltered area outdoors. Water them with 2-inches water every seven to ten days when transplanting in summer. You should also provide a light shade for the new seedlings during their first summer. Tea trees are best for transplanting to their permanent position in autumn.

Growing Tea Tree From Cuttings

Melaleuca is also propagated from cuttings, which is more reliable than seed growing if you already have an existing plant. Cut about 75 to 100 mm of the plant with the leaves removed from the lower half portion. Remove a slice of the bark and soak this in a rooting hormone solution to encourage rooting.

Taking Care Of Tea Tree Plants

Here are some important tips for growing a tea tree plant successfully.

  • Tea tree thrives in full sun and little shade.
  • They grow in either acidic or neutral soil as long as it is moist.
  • Water the plants regularly during the hot summer.
  • Irrigate the plants daily if planting on a pot.

How To Harvest Tea Tree

Tea tree has no other edible parts. Its usefulness is limited to the oil extracted from its leaves and twigs. Tea tree oil is the primary reason why tea tree is cultivated, and the secondary reason is for its ornamental value. That is why tea tree is often planted in wide plantation fields for higher product yield.

The tea tree leaves to be used in production are harvested once the plant is about two meters high. It is also pruned and gathered every 12 to 18 months to encourage new plant growth.

When harvesting tea trees, timing is important so as not to hamper future yields. The best time is when the lower leaf starts to drop off, and the stem is not yet too thick. It is also necessary to gather tea tree leaves during warm seasons instead of wet or freezing months.

Tea tree growers mechanically harvest them using a forage harvester to cut off the aerial growth. The forage harvester also chops the gathered parts to make them ready for steam distillation and oil extraction.

What Tea Tree Is Good For And Natural Remedies Made From It

Traditionally, crushed tea tree leaves were used for treating skin infections by applying them to the area with a warm mudpack. Its wood was also useful to the aborigines in making rafts and timber for roofing.

Until now, tea tree forests have had prominent roles in coastal areas. They serve as a natural trap for debris and in the prevention of soil erosion. They also serve as a habitat for aquatic animals, just like mangroves.

The tea tree foliage is also valuable in pharmacological and medical fields. Tea tree oil has potent antibacterial, antifungal, and antiviral properties. It makes tea tree oil a significant ingredient in most cosmetic, health care, and animal care products.

Tea tree oil’s best uses are for treating the following conditions:

Tea Tree - Benefits
  • Skin conditions (Acne, psoriasis, carbuncle, fungal infections, blemishes, warts, etc.)
  • Mouth and gum problems (Gingivitis, bad breath, canker sores)
  • Hair fall problems
  • Respiratory symptoms
  • Body odor
  • Earaches
  • Insect bites

Related: Bronchial Blend Homemade Tincture (Learn More)

What Parts Of Plants Are Used For Remedies

The tea tree leaves and young twigs are the most valuable part of the M. alternifolia. Traditionally, it is crushed and inhaled to clear breathing and alleviate respiratory symptoms. Steam distillation of its leaves produces the popular tea tree oil that is bottled and sold commercially.

Tea Tree Rejuvenating Bath Blend For Sore Muscles

Ingredients
  • 1 cup Epsom salt
  • ¼ cup Himalayan salt
  • ¼ cup baking soda
  • 10 drops tea tree essential oil
Steps
  1. In a mixing bowl, combine the Epsom salt and Himalayan salt and mix thoroughly.
  2. Add the baking soda and mix well.
  3. Add the drops of tea tree essential oil into the mixture and mix until well combined.
  4. Pour the finished product in cool and dry canning or mason jars.

How To Use The Remedy

Tea Tree Bath Blend for Sore Muscles - How to use

Add about ¼ to ½ cups of the mixture to a warm bath. The proportion depends on the size of the bath. Completely dissolve the salts in the water to avoid slipping. You can use this rejuvenating bath to relieve sore muscles, congestion, and inflammation.

Store in a cool and dry place. With the addition of tea tree essential oil, this bath soak will last for up to 3 months.

What Plants Resemble Tea Tree

FeatureTea Tree
(Melaleuca alternifolia)
Cajeput
(Melaleuca quinquenervia)
FlowersMany-flowered spikes; wispy and fluffy; cream or white-coloredSpike cluster; wispy; white or cream-colored
LeavesAlternate; linear; 1-35mm long, under 1mm wideAlternate; linear; 55 to 120mm long
ScentCrisp and earthy scentCamphor-like aroma
Size4 to 7 meter tall8 to 15 meter tall
Stem/TrunkPaper-bark trunkPaper-bark trunk

Warnings And Cautions:

Tea tree is a safe topical solution when applied to the skin. It is also safe for breastfeeding and pregnant women and children. However, experts warned against using pure and raw tea tree oil. It may cause allergic reactions, skin irritation, or contact dermatitis. To test product tolerance, apply a small amount of tea tree oil to the skin before using it.

The tea tree plant and its essential oil are inedible and toxic. It is, therefore, not safe for oral consumption. Ingestion of essential oil can cause serious side effects like confusion, rashes, or even coma.

Avoid using tea tree oil near the eye as it can damage the mucous membrane. When using essential oil or any alternative, it is best to consult your doctor, especially if using it with conventional medical treatment.

You may also like:

How To Make Tea Tree Oil To Treat Infections

Similar to Morphine: The Best Natural Painkiller that Grows in Your Backyard (Video)

Soak Your Troubles Away with Homemade Tub Tea

10 Trees Everyone Should Know and Why

The Complete List of Essential Oil Substitutes Please Spread The Word – Share This Post

6 Comments

  • PATRICIA JOHNSON POSTED DECEMBER 17, 2021 4:09 PMGreat Tip to know on it’s use. I will be making this! Thank you!Reply
  • WENDY POSTED DECEMBER 17, 2021 5:02 PMI liked tea tree oil even before my visit to New Zealand in 2005. My friend there pointed out that Manuka is the New Zealand variety of tea tree, and I came to really like the way it smells and my response to it; she did not tell me that Melaleuca is better for oil and Manuka is better for honey; this explains why I find plenty of Manuka honey, plenty of Melaleuca oil, and close to none of the inverse. Thanks for the education!Reply
  • PEGGY BLIUJUS POSTED DECEMBER 17, 2021 5:21 PMThank you for this article. I have used tea tree oil for at least 30 years and I recommend it to everyoneReply
  • MARINA POSTED DECEMBER 17, 2021 6:36 PMWhen the cautions and warnings say, “avoid pure oil” I feel that it means the concentration part. I use doTerra brand, even for internally consumption from their actual site otherwise it is concerning. Diluted: ( with water if taken internally or if use for skin diluted with a pure coconut oil etc) their concentration and purity is the bestReply
  • GOLDE POSTED DECEMBER 17, 2021 6:39 PMBe aware of what New Zealand has become. They drop poison all over the bush areas. I quit going there, and quit using their Manuka honey, as the suppliers could not tell me that the honey wasn’t contaminated. True story. If you would like more facts about this, read my article with many articles relating to this poison. https://www.flydreamers.com/en/articles/new-zealand-the-poisoned-nation-a1745#ref=search/resultsReply
  • DARLA POSTED DECEMBER 23, 2021 5:19 AMTea tree oil is great, but beware… it will kill cats . Use as an topical treatment for wounds will kill cats. FYIReply

Add Comment

Your email address will not be published. Required fields are marked *

Save my name, email, and website in this browser for the next time I comment.

 I accept the Privacy Policy

 Notify me of followup comments via e-mail. You can also subscribe without commenting.

Don’t miss out..  

My newsletter is packed with the most up to date knowledge on holistic health practices and powerful natural remedies from the plants growing all around us.NameSUBSCRIBE

e8063aa921b71607088915-frame.png
FOLLOW US

WE RECOMMEND
RECENT POSTS
CATEGORIES
Banner LSF - Honey Meat


The Healing Power of Backyard Plants at Your Fingertips

Follow us

Use This Recipe If You’re Losing Hair

img
Use This Recipe if You're Losing Hair - Utensils
Use This Recipe if You're Losing Hair - Ingredients
Use This Recipe if You're Losing Hair - Step 1
Use This Recipe if You're Losing Hair - Step 5
Use This Recipe if You're Losing Hair - Spray
Use This Recipe If You’re Losing Hair

Use This Recipe If You’re Losing Hair

POSTED FEBRUARY 16, 2022 BY CRISSY JOSHUA IN ALL ARTICLESBACKYARD PLANTSHOUSEHOLD REMEDIESRECIPES30

Hair loss or thinning can be caused by a number of reasons including genetics, the aging process, or an illness. Use this homemade recipe if this applies to you or you want to use it as a preventative measure and just to keep your hair in good health. Any topical treatments such as this one should be accompanied by healthy eating habits too for maximum long-term results. Foods that are commonly recommended to help counteract hair loss include foods rich in fatty acids (e.g. salmon, nuts), and greek yogurt, among a host of others.

About Rosemary

Rosemary is a herb that is native to the Mediterranean where it’s been used for centuries as medicine and food. Full of flavor, it’s also full of healing properties that do wonders for the body, inside and out. As a common herb, you should be able to buy it fresh wherever you live without having to search too hard.

It’s also a fairly easy herb to grow at home and not as fussy as some of its herb counterparts. If you enjoy growing herbs at home, rosemary prefers well-drained soil and to be kept in a sunny location. You can propagate it from an existing plant by cutting a shoot and planting it directly in your garden or a pot.

If you search online or in natural remedy books for hair loss reversal remedies that you can make at home, you will no doubt come across rosemary featuring in many. It’s long been considered good for hair growth and in recent years studies have been conducted to back up these claims and investigate why it helps and to what degree.

Rosemary for Hair Loss

Today, we’re going to make a rosemary “tea” for your hair. If you’re losing hair this can help prevent it and can promote hair growth too so can be beneficial for just about everyone. This simple recipe is so easy to use because you only need two ingredients (rosemary and water): throw these in a pot, add the mixture to a spray bottle, and include it as part of your shower routine. I’ll show you how you prepare the recipe soon. First, let’s look at how rosemary benefits your hair and reduces hair loss.

How Does Rosemary Help Reduce Hair Loss?

There have been a number of studies conducted that demonstrate rosemary prevents or helps slow down hair loss. Other studies have even shown that rosemary stimulates hair growth. If you experience pattern baldness then it can also help you.

Use This Recipe if You're Losing Hair - Rosemary pot

Rosemary is known to improve your circulation thanks to its Ursolic Acid and this can stimulate blood circulation to your scalp, which in turn helps to boost hair growth. It does this by getting more oxygen and nutrients to the hair follicles. The Carnosic Acid in rosemary can play a role in rejuvenating nerves and damaged nerve endings. This is also thought to be a factor in stimulating hair growth.

Use This Recipe if You're Losing Hair -Rosemary oil

There are plenty of properties in rosemary that contribute to a healthy scalp and hair, leading to less hair loss and less chance of breakage too. The anti-inflammatory nature of rosemary will nourish your hair follicles and make your hair shiny. If you’re trying to grow your hair then it’s as important to keep your current hair and new hair growth healthy to reduce breakage and the need to cut your hair so frequently, which rosemary will help do. Rosemary is also known to darken gray hairs and slow the appearance of new grays.

Another great side effect of using rosemary in the hair is it reduces dandruff. If you are prone to having a dry scalp then this will give you relief as it has a moisturizing effect.

How To Make A Rosemary Spray For Your Hair

This recipe is very easy to prepare but you do need some time to extract the goodness from the rosemary while it’s on the stovetop (three hours). Preparation time is just a minute or two. Here’s what you’ll need to make this and how to go about it.

Ingredients
  • Fresh rosemary (a handful of sprigs)
  • Water
Utensils
  • Medium-size pot with a lid
  • Wooden spoon
  • Fine sieve
  • Container with a lip (or funnel)
  • Spray bottle

Method

  1. Take a handful of rosemary sprigs and put these in your pot and cover with water
  2. Put the lid on your pot and turn the heat on low
  3. You’re going to leave it on the heat for three hours now but give it a stir once an hour
  4. Once the three hours is up take the pot off the heat and remove the lid
  5. Let it cool all the way
  6. Put your fine sieve over a container to catch the rosemary “tea” and pour the contents of the pot into the sieve
  7. You can discard the rosemary leaves and stalks
  8. Pour your mixture into the spray bottle and it’s ready to use

How To Use It

To apply the rosemary solution to your hair, towel dry your hair after washing it then spray the rosemary water over your hair, concentrating on the scalp. Once you have sprayed your hair, massage your scalp gently. There is no need to rinse the rosemary off and you can continue with your usual post-shower routine.

While you should not experience any negative reaction you should start using this solution twice a week in the first week of use. Then you can build this up to daily use if you like or every time you wash your hair if you don’t wash it daily. This will depend on the individual of course, and the type of hair you have. If you have allergies or sensitive skin you should patch test the rosemary water on your jawline first before spraying it on your scalp.

For best results, you should use this consistently. While you should notice shinier and healthier hair and any dryness of the scalp improve in the short term, hair growth will take longer to become evident. Be patient and remember to keep this up as part of your regular ongoing hair maintenance regime. It should keep in the fridge for 1-2 weeks.

You may also like: 

Rosemary And Sage Sore Throat Spray

Do This Before Going to Bed To Rebuild Your Gums (Video)

Homemade Natural Hair Dye

DIY Colon Detox with Ingredients You Have in Your Kitchen Right Now

10 Remedies You Can Find In Your KitchenPlease Spread The Word – Share This Post

30 Comments

  • LUZ POSTED FEBRUARY 16, 2022 11:37 AMThank you for all of the wonderful recipes. Where do I obtain some of the more uncommon plants or roots?
    Enjoy your day.Reply
    • THE LOST HERBS POSTED FEBRUARY 17, 2022 11:01 AMHi Luz,Thank you so much for your kind words. We are really glad you like our recipes.Dried rosemary can be found in the spice aisle and fresh rosemary can be found next to other fresh herbs in the produce aisle. You can find both in most grocery stores.Also, there are a couple of specialized online health stores. For example https://mountainroseherbs.com/. But it is best to use Google to find one that delivers to your area.Many blessings and good health!Reply
    • JODY HAKALA RISTOW POSTED FEBRUARY 20, 2022 10:18 AMCould we use rosemary essential oil or should we boil off from the plant sprig or rosemary?Reply
  • JOHN L. MOESCHE POSTED FEBRUARY 16, 2022 12:54 PMDiscard the stalks, but, save the leaves for your recipes.Reply
  • CLAUDIA POSTED FEBRUARY 16, 2022 3:05 PMI have been loosing my hair in handfuls every day since my illness began six months ago. Most of my hair is gone and nothing seems to stop it. I am thankful for your advice and will start today. Also, I have rosemary oil. Would that be effective to rub on my scalp daily?Reply
    • THE LOST HERBS POSTED FEBRUARY 17, 2022 11:13 AMHi Claudia,Thank you for your comment. We are sorry to hear about your illness.Rosemary has been used by many to promote hair growth successfully. Using rosemary oil could very well do the same for you. Rosemary oil can strengthen and promote circulation for thirsty hair follicles that are starving of their blood supply and leading to hair loss.Here are some ideas:1. Massage it directly into your scalp: Take about 5 drops of rosemary essential oil and massage evenly into your scalp after bath or shower. Mix with a carrier oil. Rinsing out the oil afterward is optional — though if you do rinse, let the oil sit on your scalp for at least 5 to 10 minutes beforehand.2. Mix it into your shampoo
      Simply add 10-12 drops of rosemary oil to the shampoo. Afterward, use the product like usual.3. Make your own rosemary shampoo or buy it from health stores.PS: Avoid getting essential oil in your eyes. If contact occurs, quickly rinse your eyes with cold water.
      Likewise, be careful not to apply too much to your scalp. Rosemary essential oil has been known to irritate the skin. It may cause discomfort. To avoid skin irritation, dilute the oil with a carrier oil or other product before applying it.Not enough is known about the safety of using rosemary essential oils while pregnant or breastfeeding. Though using the essential oil for hair loss is only done topically, be cautious — its effects in this regard are still unknown.Rosemary oil can take several months to work, so its use requires diligence and repetition.Many blessings and good health!Reply
    • DINA COCKRELL POSTED FEBRUARY 17, 2022 11:57 AMCan E.O. be used instead? If so how much?Reply
    • TIMOTHY WOOD POSTED FEBRUARY 17, 2022 4:03 PMalso check your shampoo , They put an ingredient in it called sodium laureth sulfate , that causes hair loss .Reply
      • TOM COOL POSTED FEBRUARY 18, 2022 6:41 PMSLS is in toothpaste also. It causes sores in my mouth. I buy toothpaste that does not have it.
  • GREG POSTED FEBRUARY 16, 2022 4:34 PMCan I dilute organic rosemary essential oil instead of the rosemary tea?Reply
    • CHARLES DEAL POSTED FEBRUARY 17, 2022 11:25 AMI’d like the answer to this as well. Thanks.Reply
    • THE LOST HERBS POSTED FEBRUARY 17, 2022 12:25 PMHi,If you want to use the essential oil, you can simply massage it directly into your scalp: Take about 5 drops of rosemary essential oil and massage evenly into your scalp after a bath or shower. Mix with a carrier oil. Rinsing out the oil afterward is optional — though if you do rinse, let the oil sit on your scalp for at least 5 to 10 minutes beforehand.Or you can mix it into your shampoo: Add 10-12 drops of rosemary oil to the shampoo. Afterward, use the product like usual.PS: Avoid getting essential oil in your eyes. If contact occurs, quickly rinse your eyes with cold water. Likewise, be careful not to apply too much to your scalp. Rosemary essential oil has been known to irritate the skin. It may cause discomfort. To avoid skin irritation, dilute the oil with a carrier oil or other product before applying it.Not enough is known about the safety of using rosemary essential oils while pregnant or breastfeeding. Though using the essential oil for hair loss is only done topically, be cautious — its effects in this regard are still unknown.Many blessings and good health!Reply
      • KAREN STINEMAN POSTED FEBRUARY 20, 2022 9:59 AMCan you make rosemary tea in a crock pot??
  • LINDA SHEPANSKI POSTED FEBRUARY 16, 2022 6:33 PMThis information sounds good. I still have rosemary growing even though it’s winter.Reply
  • RACHEL POSTED FEBRUARY 17, 2022 6:38 AMHow much water do you use with the handful of rosemary?Reply
    • LESLIE POSTED FEBRUARY 17, 2022 9:05 AMThese are my questions too. Looking forward to an answer.Reply
    • THE LOST HERBS POSTED FEBRUARY 17, 2022 11:22 AMHi,Simply boil four to five cups of water and add three to four sprigs of fresh rosemary to the water. If you don’t have fresh rosemary on hand, you can also add 10-15 drops of rosemary essential oil or a few tablespoons of organic dried rosemary. Each person is different, so if you think the mixture is too strong for your scalp, it can be diluted, by adding more water.Be aware that some essential oils can be toxic, and the volatile (easily evaporated) parts of the oils will boil off or be destroyed by the boiling temperatures.Many blessings and good health!Reply
      • BARBARA POSTED FEBRUARY 19, 2022 11:58 AMHi, thank you for this recipe. There are two different answers in regards to the water temperature. First one says keep temp on low, further down in the QAndA it mentions boiling water. Which should it be?
        Also, two conflicting answers regarding how long the tea will keep in the fridge. Is it up to five days or up to two weeks?
        Thank you.
  • TRACY POSTED FEBRUARY 17, 2022 11:39 AMThank you for this! Can I make extra rosemary tea and freeze in ice cube tray for use later on?Reply
    • THE LOST HERBS POSTED FEBRUARY 17, 2022 12:21 PMHi Tracy,Short answer: yes, you can. The tea will last up to 5 days in the fridge and up to 6 months in the freezer.
      ** Be aware that any tea that has been frozen might lose part of its flavor and potency after being thawed, especially if you reheat it.Many blessings and good health!Reply
  • EVELIN POSTED FEBRUARY 17, 2022 11:47 AMHow to use the rosemary solution if I don´t want to darken my hair? Thank you for the recipes and ideas!Reply
  • DONNA POSTED FEBRUARY 17, 2022 11:48 AMI do have thinning hair. I grow rosemary in the spring. I was wondering if I could use essential oil to make this? I have it on hand now. Please let me know.Reply
    • THE LOST HERBS POSTED FEBRUARY 17, 2022 12:25 PMHi Donna,If you want to use the essential oil, you can simply massage it directly into your scalp: Take about 5 drops of rosemary essential oil and massage evenly into your scalp after a bath or shower. Mix with a carrier oil. Rinsing out the oil afterward is optional — though if you do rinse, let the oil sit on your scalp for at least 5 to 10 minutes beforehand.Or you can mix it into your shampoo: Add 10-12 drops of rosemary oil to the shampoo. Afterward, use the product like usual.PS: Avoid getting essential oil in your eyes. If contact occurs, quickly rinse your eyes with cold water. Likewise, be careful not to apply too much to your scalp. Rosemary essential oil has been known to irritate the skin. It may cause discomfort. To avoid skin irritation, dilute the oil with a carrier oil or other product before applying it.Not enough is known about the safety of using rosemary essential oils while pregnant or breastfeeding. Though using the essential oil for hair loss is only done topically, be cautious — its effects in this regard are still unknown.Many blessings and good health!Reply
  • MANNY NEGRON POSTED FEBRUARY 17, 2022 11:55 AMHello, do you know if it would be possible to use a pressure cooked to speed up the process? BTW, this is the first time in my life that I continuously receive emails after purchase that actually useful and I read them all. Thank You!Reply
  • ROY POSTED FEBRUARY 17, 2022 12:37 PMDo you smell like Rosemary for long?Reply
  • CAROLYN POSTED FEBRUARY 17, 2022 7:03 PMDoes using this tea with rosemary cause your hair to darken?Reply
  • MARIE POSTED FEBRUARY 17, 2022 9:50 PMI was thinking maybe using Apple Cider Vinegar with the Rosemary instead of water. Thoughts?Reply
  • LESLIE POSTED FEBRUARY 18, 2022 10:50 AMCan you use rosemary essential oil with spring water to use as a leave in spritz for hair – would it provide same benefit as your original recipe of boiling and straining fresh rosemary? Thank you!Reply
  • INGRID POSTED FEBRUARY 18, 2022 8:45 PMWhy do you have to boil it for 3 hours (so long)? Will the water evaporate, and will it need topping up?Reply
  • ANNE POSTED MARCH 2, 2022 7:15 PMI would like to try this but I’m wondering if it will give my mostly-white hair a greenish tinge?Reply

Add Comment

Your email address will not be published. Required fields are marked *

Save my name, email, and website in this browser for the next time I comment.

 I accept the Privacy Policy

 Notify me of followup comments via e-mail. You can also subscribe without commenting.

FOLLOW US

WE RECOMMEND
RECENT POSTS
CATEGORIES
Banner LSF - Honey Meat


The Healing Power of Backyard Plants at Your Fingertips

Follow us

The $200 A Pound Mushroom You Should Forage For Profit

img
The $200 A Pound Mushroom You Should Forage for Profit - False Morel
The $200 A Pound Mushroom You Should Forage for Profit - expensive
The $200 A Pound Mushroom You Should Forage for Profit - Benefits
The $200 A Pound Mushroom You Should Forage for Profit - Risotto
The $200 A Pound Mushroom You Should Forage for Profit -Soup
The $200 A Pound Mushroom You Should Forage for Profit - Recipes
The $200 A Pound Mushroom You Should Forage For Profit

The $200 A Pound Mushroom You Should Forage For Profit

POSTED DECEMBER 16, 2021 BY ROSE KEEFE IN ALL ARTICLESBACKYARD PLANTSHOUSEHOLD REMEDIES12

On the surface, no one would assume that you could get rich by picking mushrooms, and normally you wouldn’t – unless that mushroom was Morel (Morchella esculenta).

Morel mushrooms sell for $20 a pound when freshly picked. Drying them first can be even more lucrative: a pound of these dried delicacies goes for up to $200, with approximately seven pounds of fresh mushrooms being needed to make a pound of dried.

Morels are highly sought after by mushroom lovers and cordon bleu chefs alike for their meaty texture and rich, nutty flavor. Even those who ordinarily wouldn’t let mushrooms touch their plate are said to enjoy them, which is one of the reasons why people are willing to pay premium prices for them.

What Are Morels?

The $200 A Pound Mushroom You Should Forage for Profit - Identification

Morel mushrooms are distinctive-looking due to their cone-shaped cap and sponge-like texture. Caps range in color from pale cream to almost black, with a pitted, honeycomb texture. Morels are hollow, stand two to four inches tall (when completely developed, some species are six inches tall), and have a white or cream stem.

Each spring, foragers in North America and Europe brave the wilderness to harvest morels and sell them at farmers’ markets or to fancy restaurants. They are typically found in wooded areas, around ash, aspen, elm, oak, and tulip trees, and other locations where conditions are warm and moist.

The $200 A Pound Mushroom You Should Forage for Profit - What are Morels

Different varieties of morels appear at different times during the season. Black morels tend to be the first to appear in North America, usually in large groups around ash trees. These are followed by yellow morels, which are often scattered alone or in small colonies. Late morels arrive last. They have small, yellow caps and can be more difficult to spot than other varieties.

How Do You Forage For Morels?

If you’ve never foraged for morels before, it’s best to do so with someone who knows how to recognize them or to get a foraging book to reference.

The $200 A Pound Mushroom You Should Forage for Profit - Forage book

There are some mushroom species known as ‘false morels’ (Verpa bohemica) that look similar but are toxic.  If there is a naturalist’s club in your area, contact them to see whether they offer guided walks or mushroom foraging sessions that can help you learn the differences.

The $200 A Pound Mushroom You Should Forage for Profit - Forage Morel

If you primarily forage on public lands, which you share with the general public, you need to be careful about over-harvesting. When you grab every morel mushroom from a given spot, it deprives others of the opportunity, and you could even damage that location from producing again.

A sustainable approach is to only harvest a small percentage of a given spot, which will leave enough mushrooms to send their spores out and give others a chance at harvesting them.

How to harvest one? Some foragers prefer to simply pinch the stem off above the ground with their fingers, while others only use a knife to cleanly snip it off.

Related: The Complete Map of Edible Plants: Find Out What You Have in Your Area! (Video)

Watch Out For False Morels

The most commonly misidentified mushroom that mushroom hunters find when looking for morels is the false morel.

When you hunt for morels, look out for these false morel’s key distinguishing features:

  • Mottled, ugly, distorted cap with no ridges.
  • Looks more like a brain – more rounded and wider.
  • Darker orange/red coloration.
  • Solid inside, often quite heavy in comparison to a morel.
  • The false morel’s stem is usually filled with cotton-like fibers.
  • With a small twist, the cap will fall right off.

These false morel mushrooms contain the toxin gyromitrin which can cause severe illness.

Symptoms include nausea, vomiting, abdominal pain, diarrhea, dizziness, headache, muscle cramps, bloating, and fatigue. Untreated, people may go on to develop confusion, delirium, seizures, and coma.

The $200 A Pound Mushroom You Should Forage for Profit - Watch out for False Morel

The gyromitrin is also toxic to the liver and can lead to right-sided abdominal pain, hepatitis, and jaundice. False morels include the Beefsteak (Gyromitra esculenta) and Early Morel (Verpa bohemica) mushrooms.

Why Are Morels So Expensive?

At upwards of $20 a pound fresh ($200 when dried), morels are a lot pricier than portobello, oyster, cremini, and other mushrooms collected for the culinary market. Here are a few of the reasons why.

  • They’re Difficult to Cultivate: It is extremely difficult to farm morel mushrooms, though Michigan State University has researched how to cultivate them. Morel farming has also been attempted in China. It is debated whether these cultivated morels are of the same quality and taste as their wild counterparts, so for the time being, hand-picked morels are staying in demand at premium prices.
  • Their Growing Season is Short: Unlike a lot of other mushroom species, morels have a short growing season. Depending on climate, elevation, and weather, you can only collect them between March and June. This rarity is another reason why they are so popular. Dried and frozen morels are available year-round, but many claims that the taste is not comparable to a fresh mushroom.
  • They’re Perishable: Being hollow, morels don’t store or transport well, so getting them to the market can be challenging. Those mushrooms that do make it command higher prices.

Health Benefits Of Morels

Both fresh and dried morels have high levels of antioxidants, vitamins, and minerals. They have the highest concentration of Vitamin D among all the edible mushrooms, with 100 grams containing 34% of your daily requirements. The same amount also contains the following mineral levels:

The $200 A Pound Mushroom You Should Forage for Profit - Medicinal Benefits
  • 69% copper, which is essential for blood cell production and cellular metabolism.
  • 52% iron, which the body uses to make hemoglobin, a protein in red blood cells, and myoglobin, a protein that provides oxygen to muscles.
  • 26% manganese, helps the body form connective tissue, bones, blood-clotting factors, and sex hormones.
  • 18% zinc, which plays a vital role in immune function.
Other Medicinal Benefits Are Outlined Below
  • Antimicrobial Properties: According to one study, morel mushrooms have impressive antimicrobial properties that may enable them to fight infections caused by yeast and bacteria. Although more research is needed in this area, the results suggest that more consumption can help the body overcome certain bacteria-related illnesses.
  • High Antioxidant Levels: Antioxidants help combat free radical damage and protect cells from oxidative stress. Several studies have indicated that antioxidants have benefits beyond the cellular level, reporting that they may also help prevent chronic diseases such as cancer and heart disease.
  • May Support a Healthy Liver: Research shows that morel mushrooms can protect and maintain liver health due to their strong antioxidant properties. An animal study conducted by the Amala Cancer Research Centre in Kerala, India showed that administering morel mushroom extract reduced liver disease markers and exhibited hepatoprotective properties.
  • May Have Cancer-Fighting Properties: Besides enhancing immunity and providing plenty of disease-fighting antioxidants, morel mushrooms may also play a crucial role in preventing cancer. The International Journal of Molecular Sciences published a study that found compounds extracted from morel mushrooms inhibit the growth and spread of colon cancer cells.
  • May Boost the Immune System: Preliminary studies suggest that certain compounds found in morels may boost the immune system and relieve inflammation. One study showed that polysaccharide extracts of the morel mushroom increased the activity and anti-inflammatory properties of immune cells.

How To Dry Morel Mushrooms At Home

Because Morel Mushrooms have quite a short season, drying them is important. This way you can store the precious fungi in air-tight containers or jars under room temperature for as long as 6 months – or even more when kept in a freezer. When using dried morels in recipes, just re-hydrate them.

  • Air-Drying: For this method, no equipment is needed, except for a few sewing supplies such as a large yarn or darning needle, and a thread.
The $200 A Pound Mushroom You Should Forage for Profit - dehydrator

Thread the needle, then string the cleaned morel mushrooms lengthwise. Knot the thread at each morel mushroom end to keep them in place, leaving at least ½” between each morel so the air can circulate every mushroom. Hang the stringed mushrooms in a dry, cool place until the morels are brittle and completely dry. This should take anywhere from 2 days to 1 week.

  • Dry the Morels in the Dehydrator: Once the morels are cleaned and dried off, lay them in a single layer on the racks. You can also slice them up if needed. Set the dehydrator to 110 F and dry for about 10 hours.
  • Oven-Drying: Whether laying the morels on cooling racks or hanging them from the oven racks, you need to heat the oven to 130 F to 140 F. Allow the mushrooms to sit for about 8 hours or until completely brittle and dry.  Check after every couple of hours.

Allow the dried morels to cool completely before transferring them to glass jars.

Cover tightly with lids and store away from direct light or heat.

Rehydrate Dried Morels
The $200 A Pound Mushroom You Should Forage for Profit - Jar

The process of rehydrating dried morels is quite simple and easy. Put the specific amount you intend to use in a bowl, then cover it with water. Let sit until the morels are soft and pliable, about 20 minutes. You may keep the soaking liquid to use in the dish you’re cooking or to make a vegetarian broth.

Use the rehydrated morel mushrooms as you would fresh ones.

How To Prepare Morel Mushrooms

You can realize the health benefits of morel mushrooms by consuming them as food.

Here are some ideas:

  • The best way to savor the flavor of morels is to cook them simply. A simple sauté with butter will help bring out the mushroom’s unique characteristics: for best results, wait until the mushrooms are browned in the cast iron pan before adding butter, as the butter may burn before the morels are ready. For added flavor, sauté with garlic and/or ginger.
  • Fried: In a large skillet, heat vegetable oil until very hot. Roll mushrooms in flour, tap off excess, and place in the oil. Pan-fry for about five to eight minutes, until mushrooms are golden brown and the flour coating is crisp. Drain morels on paper towels, salt to taste, and enjoy!
  • Boiled: If you’re a fan of Pho or Ramen, dehydrate the morels in boiling water for 15 to 30 minutes and add to your favorite recipe. They make a chewy and delicious meat substitute.
  • Pizza Topping: Rehydrated morels are a tasty and nutritious pizza topping. Sprinkle as you would regular mushrooms and then pop the pizza in the oven.
  • Simmered: To rehydrate dried morels for soups, pour boiling water over them and soak for 15 to 30 minutes. Drain and save the soaking liquid for soup stock. Then add the rehydrated morsels to soups or stews as a meat substitute.
  • Caramelized with Onions: Caramelized onions and mushrooms are the perfect addition to just about any meal. Melt three tablespoons of butter in a large skillet, add one sliced onion and 8 ounces of chopped morels, and top with pepper, stirring to coat. Simmer uncovered over medium-low heat for 30 minutes, stirring occasionally to prevent burning. Remove from heat and enjoy.
  • Mushroom powder can be mixed with flour when baking, or dusted over roasted vegetables. It is a healthy way to add umami and depth of flavor to any dish.

While morels continue to be prized for their rarity and great taste, their health and medicinal benefits are equally exceptional. Collecting them can earn an impressive second income, but don’t forget to save some for yourself as an investment in your health.

You may also like:

Banner FGW -The Mushroom That Got Me Out Of The Wheelchair

The Only 6 Medicinal Mushrooms You Need To Know

Add This “Unusual Nutrient” to Coffee or Tea, to Effortlessly and Fully Empty Your Bowels Every Single Morning (Learn More)

Food Remedies That Can Starve Cancer Cells

Homemade Lion’s Mane Tincture for Brain Fog

Eat This to Fertilize Your GutPlease Spread The Word – Share This Post

12 Comments

  • LORIE CONN POSTED DECEMBER 16, 2021 4:15 PMYou forgot to mention that when picking morels you should gently shake the mushroom after picking, over the ground where it was picked. That releases the spores to start the next generation in an already proven spot for them to grow for next year.Reply
    • MARINA POSTED DECEMBER 16, 2021 6:01 PMExcellent reminder, especially for Newbies! Thanks 😉 I get a small crop in my backyard, but am more of a country gourmand than an entrepreneur 🙂Reply
  • DAN BOGDAN POSTED DECEMBER 16, 2021 9:36 PMCould these Morel Mushrooms be found within the Georgia Forests, during the spring / early summer?Reply
  • ANGELIQUE POSTED DECEMBER 16, 2021 10:20 PMI love these mushrooms and wish they grew where I live. I secure mine from a couple of sellers on eBay. They dehydrate them and sell them at a fair price. But yes, they are expensive but worth every penny. As they are a delicacy indeed. Excellent reminder when harvesting from Lorie. Tap tap tap and then put in your sack. You want to come back to a fresh new harvest.Reply
  • SABBY POSTED DECEMBER 16, 2021 10:28 PMWent into my garden and my eyes grew wide 😳and I squealed with delight. You’d think I won the lottery, well I sorta did. From the several truckloads f cmpost I purchased at forest products, morels popped up everywhere! Truely blessed😀Reply
  • LAURIE REDMOND POSTED DECEMBER 16, 2021 10:52 PMI had some black morels growing in my yard this year, but didn’t harvest them because I knew they were growing on sumac roots. I was afraid they would be toxic because of the sumac. Are they?Reply
    • AP POSTED FEBRUARY 3, 2022 4:10 PMLaurie, I have no idea if morels growing on poison sumac roots would be safe, but most common sumac trees are not poisonous at all. If your sumac tree produces red berries, it is safe and in fact the berries themselves are edible. Poison sumac berries are white and it grows in swampy areas. Most likely, your sumac tree is not the poisonous one and the morels growing from it are safe.Reply
  • PAIGE POSTED DECEMBER 17, 2021 3:41 PMTurkey Tails are not in the Forages Guide…Reply
  • GARY MEACHEN POSTED DECEMBER 18, 2021 2:44 AMDo Morel mushrooms grow in Australia?Reply
    • THE LOST HERBS POSTED DECEMBER 21, 2021 9:11 PMHi Gary,
      There are quite a few species of Morels growing in Australia as well.Morchella Australiana is a species of ascomycete fungus in the family Morchellaceae. It is found in New South Wales, Tasmania, and Victoria, Australia.Many blessings and good health!Reply
  • JANET RENO POSTED MARCH 7, 2022 8:51 PMI am very disappointed in the way the articles print out now. I really liked it when it printed just as it showed on the computer.Reply

Add Comment

Your email address will not be published. Required fields are marked *

Save my name, email, and website in this browser for the next time I comment.

 I accept the Privacy Policy

 Notify me of followup comments via e-mail. You can also subscribe without commenting.

FOLLOW US

WE RECOMMEND
RECENT POSTS
CATEGORIES
Banner LSF - Honey Meat


The Healing Power of Backyard Plants at Your Fingertips

Follow us

How To Make A Herbal Poultice For Joint Pain

img
How to Make a Herbal Poultice for Joint Pain - Ingredients
How to Make a Herbal Poultice for Joint Pain -Essential Oils
How To Make A Herbal Poultice For Joint Pain

How To Make A Herbal Poultice For Joint Pain

POSTED DECEMBER 14, 2021 BY PETA STANGE IN ALL ARTICLESBACKYARD PLANTSHOUSEHOLD REMEDIESHOW TO10

There are many common plants that can be plucked straight from the garden or foraged from the wild and made into a soothing poultice to ease joint pain. Plants that have been traditionally used to treat pain and inflammation have been proven to work effectively, and some of the extracts have been found to be as effective as commercially produced products.

When making a poultice, it’s better to use fresh herbs and plant material and apply it immediately. This will ensure a higher potency as well as making it easier to create a sticky paste.

This poultice is best used on joints that are close to the skin, such as hands, wrists, elbows, feet, ankles, and knees. For any new ingredient, the first test is whether you are allergic to it by applying a small amount to your skin.

The following article describes a number of medicinal plants that can be found in the garden or foraged from the wild. There is also a list of essential oils that are recommended for treating joint pain.

Herbs And Wild Plants For Joint Pain Relief

Below is a list of common herbs and wild plants that have been thoroughly studied for their ability to treat arthritis and joint pain and are recommended ingredients for an herbal poultice.

  • False hellebores (Veratrum spp.) are highly poisonous when ingested due to the incredibly high concentrations of veratrum alkaloids. However, these alkaloids are very similar to steroids which are often prescribed to treat severe arthritis. For this reason, the roots were traditionally used as an external poultice for joint pain. Do not apply anything containing false hellebore to broken skin.
  • Indian tobacco (lobelia inflata) and some other tobacco plants from the genus Nicotiana contain anatabine alkaloids and salicylates. Anatabine alkaloids and salicylates can significantly decrease inflammation and joint pain in most people. Any part of the plant can be used externally for a pain relief poultice.
  • Yerba buena (Clinopodium douglasii), wild basil (Clinopodium vulgare) and other Clinopodium species have analgesic properties and are especially effective for ligament and muscle pain and less effective for the treatment of osteoarthritis and rheumatism.
  • Willow bark contains salicin which is as effective at reducing pain as aspirin and is also a traditional remedy for all types of pain.
  • Ginger has been found to block the production of some of the compounds that cause inflammation, as well as block the signal pathway for pain.
  • Turmeric has compounds that increase circulation while decreasing the concentration of two types of enzymes that are responsible for inflammation. A poultice that contains turmeric will definitely stain your skin.
  • Most plant-based oils contain anti-inflammatory properties, however, soybeanalmond and olive oil penetrates significantly deeper into the skin than other oils, so they are often used to enhance the penetration of medical creams.

Essential Oils For Joint Pain Relief

Another option is to add 5 or so drops of essential oil to your poultice. There is ample research proving the anti-inflammatory properties of a huge number of essential oils, and the brief list of oils below have additional benefits for treating joint pain.

  • Cloves contain close to 80% eugenol which is a known anesthetic and anti-inflammatory.
  • Lemongrass was found to reduce the amount of pain associated with arthritis when used topically due the citral-based anti-inflammatory. Fresh lemongrass can also be used in a poultice, but lemongrass essential oil is more potent.
  • Frankincense and myrrh have been proven to complement each other to reduce inflammation and joint pain.
  • Lavender has the ability to both relax muscles and reduce inflammation.
  • Eucalyptus is a popular ingredient for joint pain treatment due to the high concentrations of tannins which have powerful anti-inflammatory properties. Fresh leaves can also be effective in a poultice.\

How To Make An Herbal Poultice For Joint Pain

Ingredients: 

  • 1 tablespoon of false hellebore roots
  • 5 – 6 Indian tobacco leaves
  • 5 – 6 Yerba Buena or wild basil leaves
  • 1 tablespoon of finely chopped willow bark
  • 1 tablespoon of chopped ginger
  • 1 teaspoon of soybean, almond or olive oil
  • Essential oil (cloves, lemongrass, frankincense, myrrh, lavender and/or eucalyptus)
  • OPTIONAL: 1 tablespoon of turmeric powder

Method

How to Make a Herbal Poultice for Joint Pain - Step 1

Place all of the fresh ingredients except for the essential oils into a mortar and grind it into a paste with a pestle. When the paste is ready, add 1 drop of each essential oil (approximately 5 – 6 drops in total) and mix into the paste.

How to Apply

Apply the paste liberally to the affected area.

How to Make a Herbal Poultice for Joint Pain - Step 2
How to Make a Herbal Poultice for Joint Pain - Step 3

The general rule of thumb is to cover about twice the size of the affected area and to make it at least ½ an inch (1.3 cm) thick. Secure it with a piece of cheesecloth, bandage, or plastic wrap.

For hands and feet, an old pair of gloves or socks is a great way to keep the poultice in place. Don’t wrap it too tightly since you want to maintain normal blood flow to the affected area.

In some cases, the most convenient time to apply a poultice is overnight. This way the poultice and bandage won’t be a hindrance during the day, and it can be easily washed off in the morning.

It’s possible to partially freeze the paste while wrapped up in a cloth and apply the poultice as an herbal ice pack instead.

You may also like:

Homemade Ginger And Chickweed Poultice For Circulation And Sore Muscles

Why You Should Put Garlic in Your Ear Before Going to Sleep (Video)

How to Make Your Heal-All Remedy

When Painkillers Won’t be Available, Try This

How To Make Hot Pepper Cream For Joint And Back PainPlease Spread The Word – Share This Post

10 Comments

  • HELEN E AYO POSTED DECEMBER 14, 2021 3:46 PMI love herbs. This is a great idea thanku for sharing.Reply
  • BARBARA ROELING POSTED DECEMBER 14, 2021 4:24 PMVery helpful, and really appreciate the instructions and photos.Reply
    • ADELE HAYES POSTED DECEMBER 14, 2021 6:29 PMWhere can I buy these ingredients?Reply
  • TARANNUM K POSTED DECEMBER 14, 2021 4:31 PMWhere can I find these hebs?Reply
  • AMY POSTED DECEMBER 14, 2021 4:37 PMDo you have a source for some of these ingredients. My backyard doesn’t have them and people in my neck of the woods frown on foraging. It is winter here as well.Reply
  • ADELE HAYES POSTED DECEMBER 14, 2021 6:35 PMI looking for all of these ingredients as well can we get seeds & grow R own ?I would love to take a class so I can learn how to make all of these thingsReply
  • NICOLE APELIAN POSTED DECEMBER 14, 2021 6:55 PMIf you don’t want to make it yourself, here is the Joint & Movement Salve that I make for my apothecary, along with the ingredients: https://nicolesapothecary.com/products/joint-movement-arthritis-salve
    Ingredients: Organic Olive Oil Infused with Organic Calendula, Organic Arnica, Organic St. John’s Wort, Organic Cottonwood Buds, and Organic Cayenne, Organic Beeswax, Organic Helichrysum Essential Oil, Organic Frankincense Essential Oil, and Vitamin E.
    Thanks all! – NicoleReply
  • WILLIAM LILLIBRIDGE POSTED DECEMBER 15, 2021 6:30 AMThank you for this important informationReply

Add Comment

Your email address will not be published. Required fields are marked *

Save my name, email, and website in this browser for the next time I comment.

 I accept the Privacy Policy

 Notify me of followup comments via e-mail. You can also subscribe without commenting.

FOLLOW US

WE RECOMMEND
RECENT POSTS
CATEGORIES
Banner LSF - Honey Meat


The Healing Power of Backyard Plants at Your Fingertips

Follow us

10 Medicinal Herbs To Plant In Early Spring

img
10 Medicinal Herbs to Plant in Early Spring

10 Medicinal Herbs To Plant In Early Spring

POSTED 3 HOURS AGO BY STACY FILTON IN ALL ARTICLESBACKYARD PLANTSHOUSEHOLD REMEDIES0

Spring is just around the corner, and it’s time to start thinking about herb gardens. While herbs are often overlooked as a garnish or a condiment to add flavor to dishes, they can also be used for holistic medicinal purposes.

Not only are herbs safe for most people, but they are also effective in the treatment of common ailments like headaches and allergies.

This article will show you how to choose and cultivate the 10 best medicinal herbs that can be grown in early spring.

Why Herbs?

It is essential to grow your own herbs to cut down on the costs of buying fresh herbs.

These plants tend to be quite expensive, so you can save money by growing your own. Plus, it’s always a really good idea to have a few different plants around the house for when you need them.

Herbal plants have been used for centuries as part of holistic healing, and they are often used in teas and cooking.

Some studies have shown that some herbal remedies may be as effective as pharmaceuticals with fewer side effects.

How To Plant A Herb Garden

Herbs are safe for most people, but they are also instrumental in treating ailments like headaches and allergies.

In order to grow a flourishing herb garden, it’s essential to understand what you’re planting and where you will plant them.

There are dozens of different plants that fall under the category of herbs, and they can either be grown from seed or cuttings.

Seeds should be planted about an inch deep in moist soil with light furrows between each row.

Cuttings should be put into potting soil, with each pointy end sticking out for air circulation.

After planting your plants, make sure to water them thoroughly so the ground is damp all around the plant.

10 Medicinal Herbs To Plant In Early Spring

Knowing how to grow your own herbs can be very useful for those who need access to them but don’t want to buy them at the store.

In this article, you’ll learn about 10 medicinal herbs that are suitable for planting in early spring.

Chicory
10 Medicinal Herbs to Plant in Early Spring - Chicory

Chicory (Cichorium intybus var. intybus) is a perennial herb that is native to Europe and North Africa. Now it can be found growing wild in abundance in many parts of the world, including India, America, and Japan.

The plant can reach a huge height of around 50 cm, but it can also be grown in pots.

Both the shoots and leaves of this plant are edible and can be used in salads as a nutrient-dense bitter digestive, and it is often prepared like spinach.

The roots are also edible when roasted and can be used when dried as a coffee substitute.

Chicory contains a good amount of vitamin K and can be used for treating anemia, diarrhea, and constipation.

What Environment It Thrives In

The Chicory plant prefers gravel, dry waysides, or waste places.

Sow the seeds on the surface in fall or spring and thinly, to about 1 foot apart.

Related: Everything You Need to Know About Chicory

Yarrow
10 Medicinal Herbs to Plant in Early Spring - Yarrow

Great for Headaches!

Yarrow (Achillea Millefolium) is a great medicinal herb that can be grown in early spring.  Yarrow tincture is also one that everyone should have in their herb kit! Nicole likes this botanical for its antibacterial properties. It is effective for ear infections, wound care, relieving fevers, shortening the duration of the cold and flu, and helping to improve relaxation during illness. You can buy your own from the Apothecary!

Plant this perennial herb in your regular garden or woodland soil, and it will thrive.

What Environment It Thrives In

Best to sow the seeds into pots first, then when they grow, press them down against the surface of the soil, keeping them evenly moist until you see a little sprout- which happens very quickly!

After that transplant, make sure these plants are at least 18 inches apart and make sure you water them regularly so they can be loved.

Related: 50 Ways to Use Yarrow

California Poppy

California poppy, or Eschscholzia californica, is a perennial that can grow up to two feet tall. While it can be grown as an annual, spring is the best time to plant this herb.

California poppy has yellow flowers and grows in many places throughout the world.

What Environment It Thrives In

10 Medicinal Herbs to Plant in Early Spring - California Poppy

The poppy is a self-seeding perennial and can be planted as a companion to grasses.

It prefers fast-draining soil and exposure to direct sunlight, so sow it in fall or early spring by scattering the seed or using disturbed soil moistened with water.

For row crops, space the rows around 4 feet apart with 6 inches within each row for the best germination results.

The poppy will begin flowering once it reaches 18 inches long after growing rapidly from its basal rosette during this growth process.

Peppermint

Peppermint (Mentha piperita) is a beautiful herb to have in your garden. It has both medicinal and culinary uses.

Peppermint is used to soothe aching muscles, headaches, and stomachaches. You can also use peppermint to flavor certain foods to give them an exciting taste.

What Environment It Thrives In

10 Medicinal Herbs to Plant in Early Spring - Peppermint

The creeping perennial plant prefers full sun to shade and moist soil.

Mix the tiny seed with a bit of sand for easier sowing, then scatter on the surface of the soil and press it in firmly.

Keep evenly moist until germination- which takes 1 to 2 weeks- by watering regularly; if necessary, cover seeds with the potting mixture or fine vermiculite.

Transplant or thin plants 6 inches apart after they’ve been growing for 3 months, harvesting during flowering stage (flowers are purple).

Bundle them up by hand when they’re dry enough so that you can remove their stems from prime tea herbs.

Chamomile

Chamomile (Oenothera biennis) is one of the most popular herbs to grow in a garden. This herb is often used as a tea for its calming effects. It is also helpful in treating allergies, headaches, and insomnia.

Chamomile grows best in full sunlight and can be planted in well-drained soil.

What Environment It Thrives In

10 Medicinal Herbs to Plant in Early Spring - Chamomile

Self-seeding annuals flower in the spring and are ready to harvest for tea by early summer.

Plant them about 80 days before maturity alongside regular garden soil or alkaline soils in the sun (or part shade).

To make sure you stretch your seed supply, mix tiny seeds with sand and sprinkle them thinly on disturbed land or a weed-free seedbed.

Thin out each plant to be 3 inches apart and harvest flowers while they’re still young as they will lose flavor when dried out too long!

Related: Soothing Medicinal Herbs for Deep Rest

Evening Primrose
10 Medicinal Herbs to Plant in Early Spring - Evening Primrose

Evening Primrose (Oenothera biennis), an herb with a history in herbal medicine going back to the medieval era, is known for its ability to treat eczema, psoriasis, and dermatitis.

What Environment It Thrives In

Once you have evening primrose seeds, it’s a good idea to plant them in either the fall or early spring and make sure they’re planted in an area that gets full sun as well as cultivated soil.

Sow the primrose seeds on top of the soil and water thoroughly so they can germinate.

Make sure there is enough space for seedlings once they’ve sprouted – about 1 foot apart from each other should do!

Related: How to Treat Gastrointestinal Disorders With Evening Primrose

Meadowsweet
10 Medicinal Herbs to Plant in Early Spring - Meadowsweet

Meadowsweet has long been used for its natural anti-inflammatory properties. It can be used to treat coughs, sore throats, and asthmatic symptoms. Meadowsweet is rich in salicylic acid, which means it can also help relieve pain from arthritis.

It’s easy to cultivate meadowsweet as it will grow well without a great deal of maintenance.

What Environment It Thrives In

A herbaceous perennial prefers sun to partial shade, moist soils.

In early spring, seeding should be done either directly into the garden or greenhouse.

Barely cover the seeds with excess soil and tamp well; keep evenly moist until germination is seen in 3-6 weeks (slow at first but eventually fast-growing).

Once plants have developed their second set of leaves, they can be thinned or transplanted out to 1-2 feet apart if needed.

Echinacea
10 Medicinal Herbs to Plant in Early Spring - Echinacea

Echinacea, or purple coneflower, is a popular medicinal herb and can be found in many gardens. This herb is most commonly used as an immune system booster. It helps with symptoms of colds, flu, and other respiratory infections.

However, it should not be used for more than 10 days without consulting your doctor.

What Environment It Thrives In

This herbaceous perennial prefers moist but well-drained fertile soil in the full sun.

This is the most adaptable of all species and is a dependable choice for gardeners and medicine makers.

Sow during springtime by either directly planting into prepared garden beds or pots distributed at least 1 to 2 feet distance from one another; germination may take up to 30 days.

Carefully cultivate frequently while maintaining a height of 3 to 4 feet tall with flowers visible on its stem.

Related: Elderberry Syrup With Echinacea and Goldenseal

Calendula
10 Medicinal Herbs to Plant in Early Spring - Calendula

Calendula (Mixed Calendula officinalis) is a great herb to plant in early spring.

It’s known for treating skin irritations and can be used as a poultice or tea to treat fever, respiratory infections, and chronic skin conditions.

What Environment It Thrives In

Self-seeding annual. 40 to 50 days to maturity.

The plant loves good garden soil, full sun, and regular watering in the springtime; go ahead and sow in pots or directly into your garden.

Barely cover, tamp securely and keep evenly moist, warm, and exposed at all times of day (not just when it is light).

Thin or transplant between 6-12 inches apart after appearing on their own after about a week!

Related: How To Make a Powerful Calendula Extract to Keep in Your Medicine Cabinet

Feverfew
10 Medicinal Herbs to Plant in Early Spring - Feverfew

Feverfew (Tanacetum parthenium or Chrysanthemum parthenium) is one of the most well-known herbs for medicinal purposes. It has such a variety of uses, including the treatment of headaches and migraines, inflammation and arthritis, menstrual cramps, and arthritis.

Feverfew can be grown in early to late spring and is easy to grow at home.

What Environment It Thrives In

Feverfew seeds are readily available, and the seeds are very fine and easily planted in smaller peat pots filled with moderately damp soil.

Sprinkle a fair few seeds into the pot and tap the bottom of the pot on the counter to settle them into the soil before covering them with more dirt; spray water to keep them moist as poured water may dislodge them from their planting site!

When placed under a grow light for about 2 weeks, you should start seeing signs that they have germinated well- just make sure not to plant too early because plants should reach 3 inches (7½ cm).

Once your feverfew plants reach this height, you can then plant them outside after having watered regularly until roots take hold.

Related: DIY Headache Recipe For Instant Pain Relief

Spring is the best time to plant herbal plants with medicinal qualities.

With the changing of seasons, you can use these herbs to help heal ailments brought on by the winter weather.

Starting your herb garden off right with some fresh medicinal herbaceous plants will help your immune system stay strong!

The Medicinal Garden Kit

Medicinal herbs are a fun and easy way to add an element of interest to your garden.

We’ve gathered all the seeds for these 10 herbs, inside the Medicinal Garden Kit. All these seeds have been handpicked from the very best plants. The Medicinal Garden Kit has no chemicals, genetic modifications, or any other alterations. With your seeds kit, you’ll also receive a FREE Medicinal Guide that shows you how to turn these 10 plants into tinctures, ointments, salves, poultices, decoctions, infusions, essential oils —all in minute detail so you can follow our guide even if you’ve never made an herbal medicine in your life.

Even if you’ve never planted anything before, you’ll have no trouble growing the plants included in this package. Inside your Medicinal Garden Kit, you’ll also find 10 smaller packages with each type of seed. On them you’ll find details on how to plant, grow, and harvest each one.

All in all, the Medicinal Garden Kit contains 1,625 of the highest quality seeds from plants homegrown in the U.S.  Check out The Medicinal Garden Kit here!

You may also like:

Banner MK - Stop spending money

Soothing Medicinal Herbs for Deep Rest

How To Make A Scalable Self-Sustaining Greenhouse (Video)

How to Make Your Own Natural First Aid Kit

20 Edible And Medicinal Plants You Can Forage In March

God’s Pharmacy: 10 Medicinal Plants from the BiblePlease Spread The Word – Share This Post

Add Comment

Your email address will not be published. Required fields are marked *

Save my name, email, and website in this browser for the next time I comment.

 I accept the Privacy Policy

 Notify me of followup comments via e-mail. You can also subscribe without commenting.

Don’t miss out..  

My newsletter is packed with the most up to date knowledge on holistic health practices and powerful natural remedies from the plants growing all around us.NameSUBSCRIBE

e8063aa921b71607088915-frame.png
FOLLOW US

WE RECOMMEND
RECENT POSTS
CATEGORIES
Banner LSF - Honey Meat


The Healing Power of Backyard Plants at Your Fingertips

Follow usWe use cookies to ensure that we give you the best experience on our website. If you continue to use this site we will assume that you are happy with it.Ok

Niko’s

I’m not necessary looking to milk the Kikos, but they were originally cross bread with three milk goat breeds; so they can be a milk goat again. That’s why I’m planning to cross Kiko nannies with the Nigerian bucks, and make them a tad smaller and both meat/milk quality.

Q&A: Would you be open to building a small place. Or living in an RV for a bit

“I keep 3 farm cats for mouse control but I have not found the cats I like yet. I have one who is going to have kittens at some point and I will probably be picking my first kitten from her litter.

But I like to have 3 males.

I have no mouse issues whatsoever at the moment. I’ve never seen a mouse here. But the gal that moved had cats.

Would you be open to building a small place. Or living in an RV for a bit?

Not saying it’s a go yet but just trying to get an idea of options.

David is not totally in favor of other guys moving in but I need collaboration like you said, with someone who is motivated and makes things happen.

I need someone who understands permaculture and food forests to transform this place. I can’t even get him to sit a watch a video with me so it’s all on me to design and plan but because he doesn’t have the full concept it’s not a priority for him.

Do you have a day when you would be able to come visit?

I have a moving job Saturday. Did you say you have Mondays off?”

Oh… his name is David too? Maybe we can keep the name DD&D, if you change your name to David too… lol

No… seriously… I have no problem with that. I’ve pretty much been staying in a camper when I’m home; or in my big truck, on the more severe days. I haven’t built a cabin for me yet, because I’ve been focusing on infrastructure and housing for the animals first.

I don’t totally understand permaculture design, but I’ve been learning. I do understand Food Forestry and wildcrafting. Sounds like both of our David’s lack the necessary motivation we need. My friend Cindy calls us “The Odd Couple”… but at least your David is productive, even though it’s a different kind of productive.

I am off on the weekends, I was only off this Monday because I wanted to make sure the goats got their medicine. I have a funeral to go to on the 19th, otherwise I’m available.

goat farmer

I never saw myself as a goat farmer growing up, even though I have relatives who are farmers. I grew up in the Military, was a city boy for some time. I have been into natural medicine and alternative energy since the 90’s – in 2012 I went OffGrid and started becoming a farmer. My friend introduced me to Nigerian Dwarfs, and they liked me more then they did him. He called me the goat whisperer; but then again, most animals like me.

I like the manageable size of Nigerians, but neither I nor my friend milks them. I am not personally all that interested in milking them, and apparently he isn’t either; even though that is why he said he has them.

We have had Nigerian on the land for 10 years, and he has milked them twice. At this point, they are just POCM’s (Pet Organic Composting Machines). So; since he has been talking about breading Kiko’s into the herd, I decided to do just that. I just got some Kiko/Spanish goat nannies; I wanted Spanish goats because of their parasite resistance, and Kiko was originally three milk goats (Anglo-Nubian, Saanan & Toggenburg) crossed with a feral New Zealand goat to make a meat goat.

Kiko’s are still a bit too big for my taste, so I am breading in the Nigrein’s to give the Kiko’s back their milk quality and still be meat goats. Not too big, but not too small; and easier to manage. But don’t freak out, I am not breading large bucks with small does. All my males are and will be Nigerians, the Spanish/Kiko cross is and will be female. I will sell the male offspring, I will keep the daughter, and sell the grand daughters; to prevent too much inbreeding.

Thanx!